Tuesday, 8 October 2013

Playing House

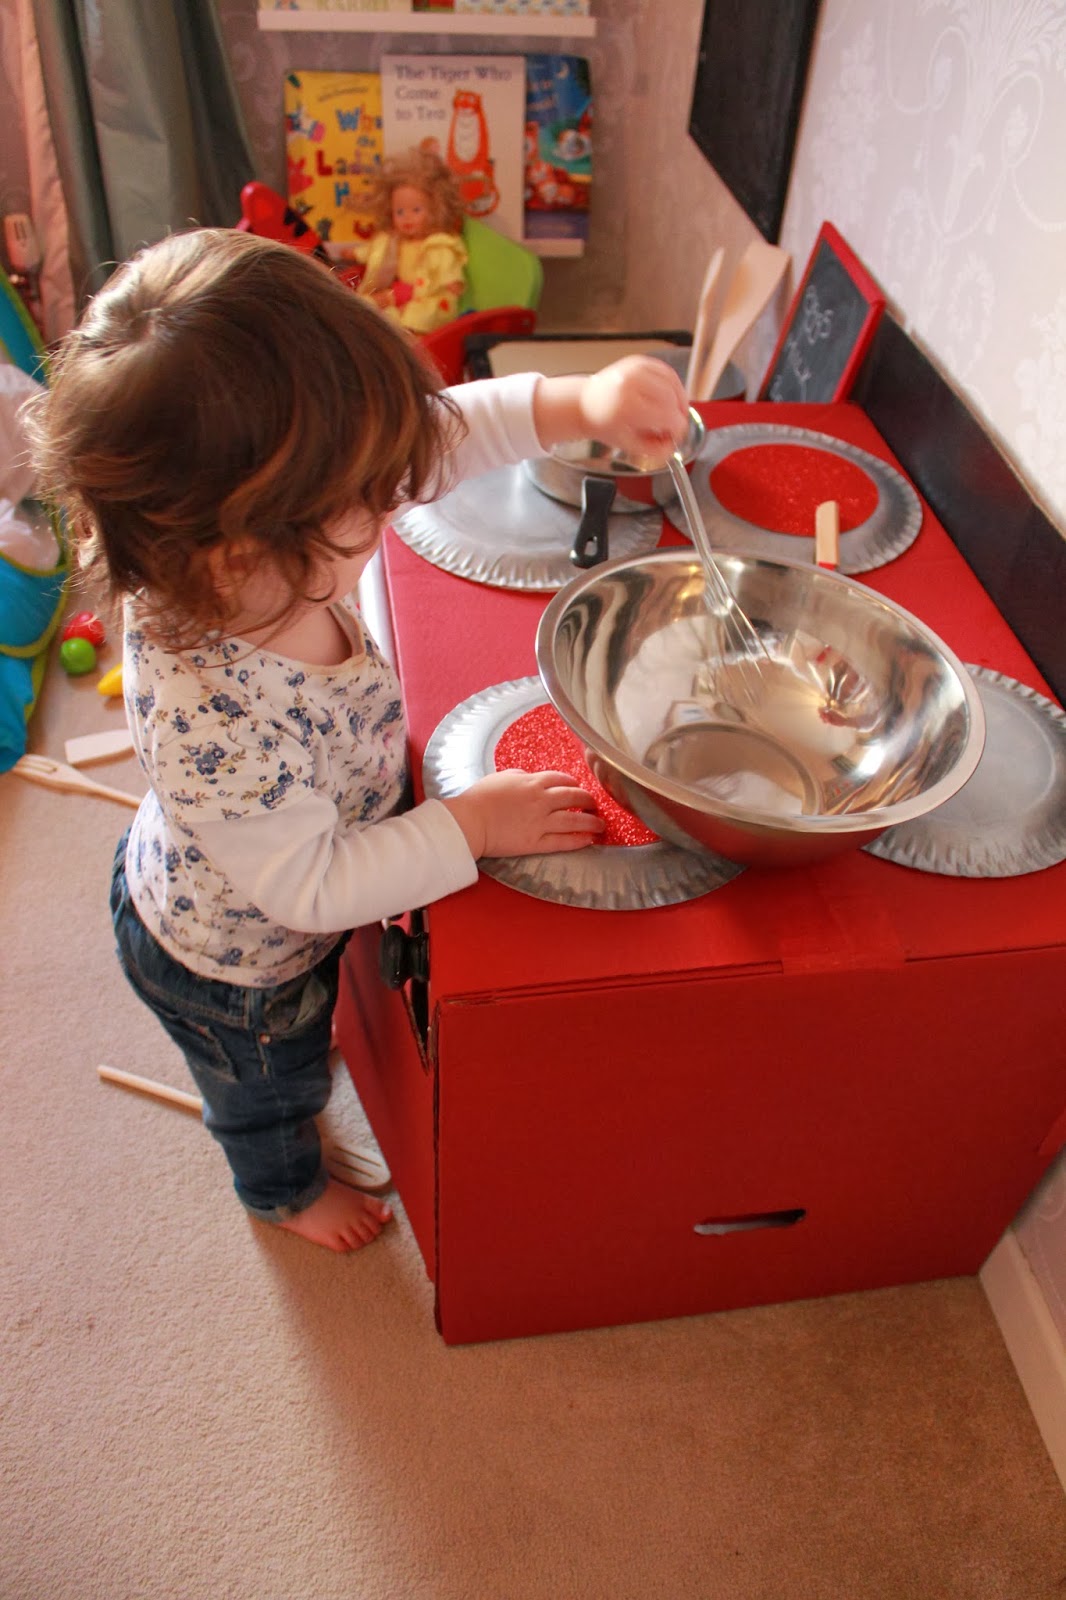
The kitchen is the heart of the home, as the expression goes, and now it's the heart of the nursery too with this little addition to my daughter's play things.


The eagle eyed amongst you might find this box to be somewhat familiar. It's actually the bus I made for her in the summer, recycled to become a play oven.


I've been looking on line recently at some of the beautiful wooden play kitchen's you can buy and longing for something along their lines, but sadly my budget was not going to stretch to one. So I thought about it for a little while, and then figured the next best thing was to raid the recycling box, grab the glue gun and make something myself for far fewer pennies.


 The bus had been well played with but after a fair amount of, ahem, vandalism it had been retired from service and was acting as a capacious toy box. After re-homing the toys (dumping them in a corner, pretty unceremoniously) I cut two doors into one side, glued an additional piece to the back, added some old cupboard door knobs for dials and painted some paper plates to make hot plates and gave the whole thing a freshen up with an extra coat of paint. Et voila, an oven!


This is by no means perfect (as evidenced by these photographs) but children don't care about perfection (or pinterest worthy pictures) and so I'm not worrying about it either. Life's too short, and the life expectancy of a cardboard toy in the hands of a toddler is potentially even shorten, so don't let fear of not being 'perfect' hold you back from trying something like this.

A few props and this kitchen is ready to go!


My mini chef was eager to get started and immediately began wipping up some delightful treats.


Even bath time only provided a brief interlude to her culinary endeavors as she ran straight back to it afterwards and gave a rather literal interpretation to the title 'naked chef'!

I'd love to know what unusual uses you've put cardboard boxes to, for kids or otherwise, so leave me a comment!

Coco Blue

Friday, 13 September 2013

It's a Wrap!


September is a busy month birthday wise in my family. We are, in fact, holding our breath waiting for another new addition who's expected to make an appearance any day now (I've got my fingers crossed for you little sis that it's soon!).

And we all know that birthdays mean presents and presents - to me - mean wrapping. I love to give a present that's wrapped beautifully if I can. Sometimes, even if the present itself is modest, taking time over the wrapping can show that you care and that you thought about the person you were selecting a gift for.

I've used different things for wrapping presents in the past, but had never tried making my own wrapping paper. Until this week. In a nod to thrifty chic and all things upcycled I decided to use things I had to hand and, in recognition of my limited craft skills, I also tried to keep it nice and simple.


So I gathered together my supplies and set to work. For this I used some plain wallpaper lining paper, acrylic paints and some old champagne corks (and these really are old, lest you run away with the idea that I am quaffing champagne every evening - If only!) A trusty tin foil pie dish acts as a palate.

Once I'd taped my lining paper to my surface to prevent it rolling back up I just stamped away in a fairly random way, trying to space the colours in a way that seemed pleasing.


Hand Stamped Wrapping Paper


You could of course use lots of other things in place of the corks. I like the simplicity of the polka dots but could imagine it working beautifully with letter or number stamps, or even a leaf now that we are entering autumn. I can see a lot of DIY wrapping paper stamping in my future!


Hopefully the gift will be well received and they will appreciate the little bit of effort (a very little bit, it must be said!) that went into making the wrapping.


Bakers Twine and Wrapping Paper

A certain little someone I know was definitely intrigued by the package! We haven't quite mastered the idea that not all presents are for oneself...

Saturday, 24 August 2013

Days of Wine and Roses


It's hard to believe that we are already edging towards the end of summer. It seemed like just yesterday that we were tentatively enjoying the first warm days after what seemed like an interminable winter, but August will draw to a close next week and some of us will be starting to think about getting things together for the start of a new school year. My little one will be starting day nursery in September which feels like a very big step!

However, before we completely turn our backs on summer I thought I would share with you a few of my pictures from the two weeks we spent in France at the end of May this year. It was a lovely break for us all before we started on our new schedules of childminders and work in June and it gave us a great chance to enjoy some new places and practice our rather terrible French.


We stayed in a beautiful village in the Languadoc Rousillon region of France. This is wine country and you are surrounded by vinyards everywhere and the landscape is expansive and varied. There are so many beautiful spots to visit in this region but on this trip, with a one year old in tow, we kept our sight seeing close to home. With every village seemingly full of wonderful old buildings with enticing cobbled streets and markets to explore this didn't feel as if we missed out at all!

One of the things I loved seeing was the wealth of colour everywhere. From the roses that spilled around every door way to the doorways themselves, the whole trip seemed saturated with beautiful colours.

Here are a few of my favourite colourful snaps:


The beautiful flower market at Beziers.


 A fish shaped door knocker.


So many beautiful doors and shutters - I may have taken a ridiculous number of pictures just of these things...


 Glorious roses seemed to grow everywhere. Roses have to be my favourite flowers, no question.


 Such a beautiful blue. But my favourite part - the christmas wreath still hanging above the door!


Altogether it was a wonderful two weeks full of sights and experiences to refresh us, from fresh croissants from the local baker each morning, to strolling around markets looking at the wonderful produce, to watching 'Mike Le Chevalier' while we ate breakfast (well, let's be realistic, we were on holiday with a one year old - it couldn't all be cultural and foodie!). I hope you have all been enjoying a wonderful summer, I'd love to hear about your travels, either near or far!

Coco Blue.


Monday, 1 July 2013

A Lesson in Parental Hubris


June has been a busy month for us with birthdays, anniversaries and getting used to our new routines now I am back at work, but we have also been trying to make lots of time for fun stuff too and especially time to spend with the little lady in our family. To that end the mister and I decided we would try to make something (simple, obviously) for our daughter to play with and since we had a box knocking around which she had had lots of fun playing with, we thought it would be cute if we turned it into something. Inspired by things I had seen on blogs and pinterest etc, we settled on making our box into a bus.

So this weekend, while our little one napped one afternoon we got out the paints and glue gun and got to work. We painted the box, painted paper plates for wheels, stuck on some shiny card (I did tell you it was simple!) and probably spent a little too long playing with photoshop to make a cute little license plate. We finished up our efforts that evening after bedtime.

We stood back and admired our handy work, mentally patting ourselves on the back for being cute and clever.

The next morning we proudly showed off our bus box to our daughter, plonked her inside and loved watching her laugh as her daddy wizzed her up and down the hallway in it. Being a snap happy mama I naturally took a billion pictures of this.


After the fun we left our little one to play while we got on with the morning tasks. After five minutes alone with the bus our angel had already found a weak spot in the construction and had begun testing the security of the windows and the solidity of the headlights. I'm pretty sure she has a budding career as a vandal ahead of her! I suspect only the absence of crayons immediately to hand stopped her from tagging the side of the bus aswell.

C'est la vie!

The moral of the story is this. She loved the box. She loved the bus. She loved being wizzed up and down the hallway in the box, however it looked. (In fact, I've wizzed her around in an empty laundry basket with just the same response). Really, we didn't need to make the box pretty for her. We probably did it more for ourselves in truth. But it was fun! And ultimately, if the bus box only last five mintues unscathed it doesn't matter, just as it wouldn't have mattered if we'd left her with just an undecorated box to play with. It's far more important I guess to take the time to wizz her round and make her laugh than anything else (and most importantly, to take the time to laugh with her while we wizz her round) because it's easy to get caught up in the day to day necessary tasks which we 'have' to get done and forget the fun that can be found in the everyday.

At least this is one parenting lesson which is easily learned, if not always easily remembered!

 I hope you all had a lovely weekend and a fun filled June, the summer stretches ahead of us - I hope we can make lots more memories in the weeks to come!

Coco Blue.

Sunday, 2 June 2013

The days were long, but the year was short.


So, on Tuesday my maternity leave ends and I go back to work. In just ten days time my baby will be one. She took her first steps today. Last week we were on holiday in France and while we were there she refused to be spoon fed anything but fromage fraise and it's continued now we are home. She drinks her milk from a cup. She can climb off the sofa by means other than just launching herself face first at the floor. I am proud of every new thing she learns and I broadcast it to the world, probably to the annoyance of more than a few of my facebook friends, but each new achievement reminds me that everyday my baby is growing up, becoming her own person and that one day she may not need me quite as much as she does now.


As much as it may tug my heartstrings however, I know that this is what my job is. To help my daughter to grow into the person she will be, to find her footing and her place in the world. And it is my privilege and honour to be there with her while she makes each new discovery. I don't think I knew what to expect from motherhood. While I was preparing for it in the last months of my pregnancy, I organised and tidied, I bought in food to fill the cupboards, I batch cooked to stock the freezer, I prepared the nursery and the crib which would be in our bedroom. I made list after list after list of things to be done. I prepared for siege and told myself that you just had to be ready for mess and chaos, but if you put enough systems in place you could cope. I couldn't have even begun to know how to prepare my heart for the onslaught of emotions that followed the moment they placed my daughter in my arms. A siege of Love and Joy and Terror in equal measure laid claim to me in that instant, it hasn't let up since.

I didn't know how much it would change me.


Those first few weeks with a new baby are almost indescribable. In a day, an hour, a minute even, you  run the full gamut of emotions as you juggle feeding, changing, rocking to sleep, try to clothe yourself and remember to eat. You run to the bathroom the moment your husband comes in and can take the baby which will sleep nowhere but your arms and so has had you imprisoned on the sofa for an entire afternoon. You learn new levels of love as you jolt from sleep at 4 am just to listen to the snuffling noises coming from the crib next to your bed. And when you think that your exhausted body can take no more and you pray for just a moments peace, they smile at you and in that moment it's all been worth it.


So now, with ten days to go till the big ONE birthday, with the knowledge that our days together will be fewer as I go back to work, I want to say Thank You to my daughter; for making me your mother, for moulding my heart with each of your smiles, for teaching me everyday the wonder of the world you live in. I rediscover the world when I watch you, the fascination in your face on seeing the most mundane of things makes me see them anew with you. Each new discovery you make, I make along side you and I am excited to see what the next year will bring. I look forward to the games we will play together, the songs we may sing (because you love to sing now and talk whenever others are talking even though you haven't yet found words) and the adventures we will have. I hope I am equal to the task ahead of me, helping you grow and learn and become who you are. But I know that even if I make mistakes it will be OK, because I am learning just as you are and the process of becoming will never end. Mistakes are part of the journey. So thank you, I love you more than words can begin to say, you are beautiful and you make every day beautiful for me.


Mummy.

(Coco Blue)


Friday, 26 April 2013

Bureau de Change

Firstly - I have to apologise, I have a terrible weakness for puns, word play and the like, so please excuse the post title.

Now that another of my secrets is out of the way here's what I am showing you this week - said Bureau:


You may recognise it from my master bedroom post, where I told you it would be looking for a new home. Well we haven't found the new home yet, but a few more options have opened up for it now that it's had a little bit of paint and attention.

Without wishing to sound predictable this bureau was found on a cold grey Saturday several years ago, languishing (rather unloved I felt) in the corner of a charity shop. I felt compelled to rescue it as I was looking for a small desk with storage for my teeny tiny living room and I liked the dark wood and the price tag. Home it came with me (or rather, with the hubby as what I invariably do on these occasions is find a piece of furniture, fall in love, buy it, then place a call to Mr Coco Blue asking him ever so nicely if he wouldn't mind picking it up for me. He's always thrilled to receive these calls, as you can imagine!)


So home it came with me and for a while it did service as a desk/craft stuff holder and then when we moved house it shuffled around the flat playing host to everything from drinks to junk to clothes, until finally coming to rest in the master bedroom possibly due to inertia. As it was looking somewhat unloved and the worse for wear after a mishap with a kitten it had a bit of emergency surgery and then a rejuvenating facelift. Now it just needs a loving home to rest in, happy to show of its new colours with pride.


As a side note, Mr CB expressed some reservations about the drawers being a different colour to the body of the bureau. Now personally I rather like the contrast but I'd love to know what others think!


Thanks for stopping by, I hope you have a great weekend!


Coco Blue

Thursday, 18 April 2013

Pint Sized Teepee


Yesterday I made this little teepee for my little half pint. It's just the right size to have up in the living room without taking up the whole floor space and just the right size for a mini explorer. It's also very simple to make and the materials are easy to get hold of ( you'll probably find you already have them around the house).


You'll need:

4-6 Garden Canes (mine are the half size ones as I didn't need it to be too tall).
4 Small bag clips or pegs
1 Elastic band
1 Sheet (or duvet cover as mine is)
Ribbon, Feathers, Paper bunting etc to decorate.


First, take the 4-6 garden canes and wrap and elastic band around the bundle of sticks about two inches down from the top. Next, in your chosen location, fan out the canes to create your teepee structure. Leave a larger gap at the front for your opening. Those of you lucky enough to have a garden will be able to push the canes into the ground a little to help anchor the teepee. Otherwise just anchor the canes in the pile of the carpet or a rug.

Once your frame is up drape your sheet/duvet cover around the canes, securing with a bag clip at the top of the front canes.


To hold back the excess fabric at the front of the teepee I folded it back into the tent and secured it to another cane with two more clips.


That is your basic structure done. Then it's just a case of decorating! I had a pack of craft feathers left over and so selected a few to add to the top of the teepee and tied them in place with some ribbon. Then I strung some extra paper bunting around the outside. You could add flags to the top, or pompom trim or just leave it bare. Really, whatever seems the most fun!


And, because every one needs a companion on their explorations, an old hobby horse got into the spirit too.


I think we may decamp come summer to Grandma's rather more expansive garden and enjoy some outside adventuring with this little teepee.

I'd love to know if any of you try this!

Coco Blue